private static final int LIST_SIZE = 1000000; // 1_000_000

    public static void main(String[] args) {

        OptimalTest.speed("ArrayList", ListTest::arrayListTest);
        OptimalTest.speed("InitialCapacity ArrayList", ListTest::initialCapacityTest);

//        ArrayList Method Average Speed : 60ms
//        InitialCapacity ArrayList Method Average Speed : 46ms
//        속도 차이 : 14ms
    }

    private static void arrayListTest() {
        List<String> test = new ArrayList<>();
        for (int i = 0; i < LIST_SIZE; i++) {
            test.add(String.valueOf(i));
        }
    }
    private static void initialCapacityTest() {
        List<String> test = new ArrayList<>(LIST_SIZE);
        for (int i = 0; i < LIST_SIZE; i++) {
            test.add(String.valueOf(i));
        }
    }
실제로 capacity 값을 미리 설정해준다면 유의미한 속도향상을 확인할 수 있었습니다.
ArrayList vs LinkedList
어느정도 예상하시겠지만 ArrayList와 LinkedList의 속도도 비교해보았습니다.
    private static final int LIST_SIZE = 1000000; // 1_000_000

    public static void main(String[] args) {
        OptimalTest.speed("ArrayList", ListTest::arrayListTest);
        OptimalTest.speed("InitialCapacity ArrayList", ListTest::initialCapacityTest);
        OptimalTest.speed("LinkedList", ListTest::linkedListTest);
//        ArrayList Method Average Speed : 63ms
//        InitialCapacity ArrayList Method Average Speed : 47ms
//        LinkedList Method, Speed : 42ms
//        속도 차이 : 22ms
    }

    private static void arrayListTest() {
        ArrayList<String> test = new ArrayList<>();
        for (int i = 0; i < LIST_SIZE; i++) {
            test.add(String.valueOf(i));
        }
    }
    private static void initialCapacityTest() {
        ArrayList<String> test = new ArrayList<>(LIST_SIZE);
        for (int i = 0; i < LIST_SIZE; i++) {
            test.add(String.valueOf(i));
        }
    }
    private static void linkedListTest() {
        LinkedList<String> test = new LinkedList<>();
        for (int i = 0; i < LIST_SIZE; i++) {
            test.add(String.valueOf(i));
        }
    }
저장용량을 늘릴 필요가 없는 LinkedList가 가장 빨랐고,
저장용량을 설정한 ArrayList가 두번째,
저장용량을 설정하지 않은 ArrayList가 가장 느렸습니다.
Remove
    public static void main(String[] args) {
        OptimalTest.speed("ArrayList", () -> arrayListRemove(arraylist));
        OptimalTest.speed("LinkedList", () -> linkedListRemove(linkedlist));
//        ArrayList Remove Method Average Speed : 146ms
//        LinkedList Remove Method Average Speed : 0ms
    }

    private static void arrayListRemove(List<String> arraylist) {
        for (int i = 0; i < 1000; i++) {
             arraylist.remove(0);
        }
    }

    private static void linkedListRemove(List<String> linkedlist) {
        for (int i = 0; i < 1000; i++) {
            linkedlist.remove(0);
        }
    }
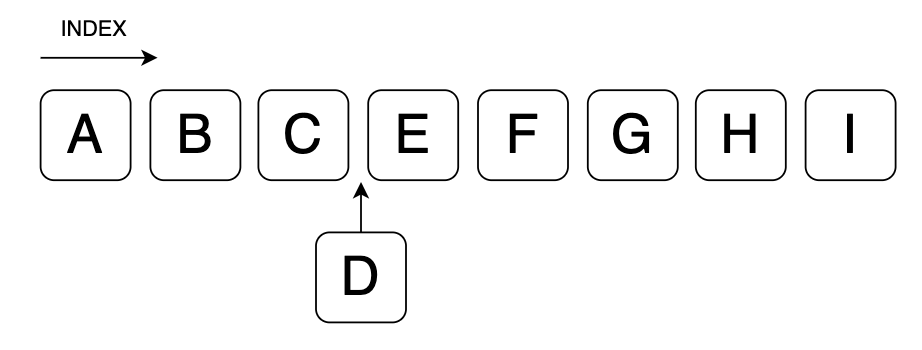
200번의 테스트때문에 1000번씩 0번 INDEX를 Remove 한 결과입니다.
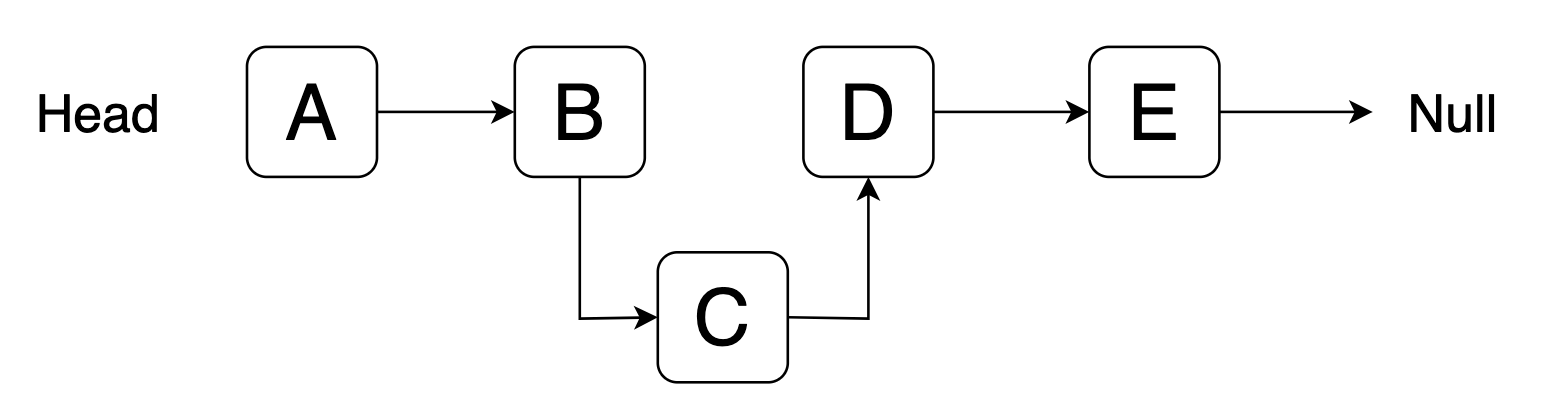
노드의 경로만 변경해주면되는 LinkedList와는 다르게 ArrayList는 0번 INDEX를 제외한 나머지 배열을 한칸 앞으로 이동해야하기 때문에 속도 차이가 많이 벌어진것입니다.
Add
    public static void main(String[] args) {
        OptimalTest.speed("ArrayList Add", () -> arrayListRemove(arraylist));
        OptimalTest.speed("LinkedList Add", () -> linkedListRemove(linkedlist));
//        ArrayList Add Method Average Speed : 277ms
//        LinkedList Add Method Average Speed : 0ms
    }

    private static void arrayListRemove(ArrayList<String> arraylist) {
        for (int i = 0; i < 1000; i++) {
             arraylist.add(0, String.valueOf(i));
        }
    }

    private static void linkedListRemove(LinkedList<String> linkedlist) {
        for (int i = 0; i < 1000; i++) {
            linkedlist.add(0, String.valueOf(i));
        }
    }
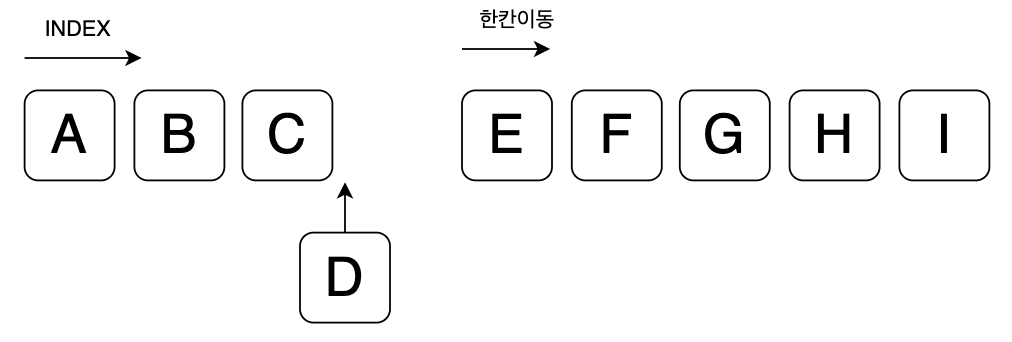
0번 INDEX에 Add도 마찬가지였습니다.
여기서 중요한건 가장 뒤에 add하는 것은 LinkedList와 ArrayList와의 차이가 나지않을정도로 작습니다.
모든 결과를 보았을 때 전체적으로 LinkedList가 훨씬 좋아보입니다. 그렇다면 이제 ArrayList를 사용하지 않고 LinkedList만 사용해야할 까요?
    public static void main(String[] args) {
        OptimalTest.speed("ArrayList Get", () -> arrayListRemove(arraylist));
        OptimalTest.speed("LinkedList Get", () -> linkedListRemove(linkedlist));
//        ArrayList Get Method Average Speed : 0ms
//        LinkedList Get Method Average Speed : 712ms
    }

    private static void arrayListGet(ArrayList<String> arraylist) {
        for (int i = 0; i < LIST_SIZE; i++) {
            arraylist.get(LIST_SIZE / 2);
        }
    }

    private static void linkedListGet(LinkedList<String> linkedlist) {
        for (int i = 0; i < 100; i++) {
            linkedlist.get(LIST_SIZE / 2);
        }
    }
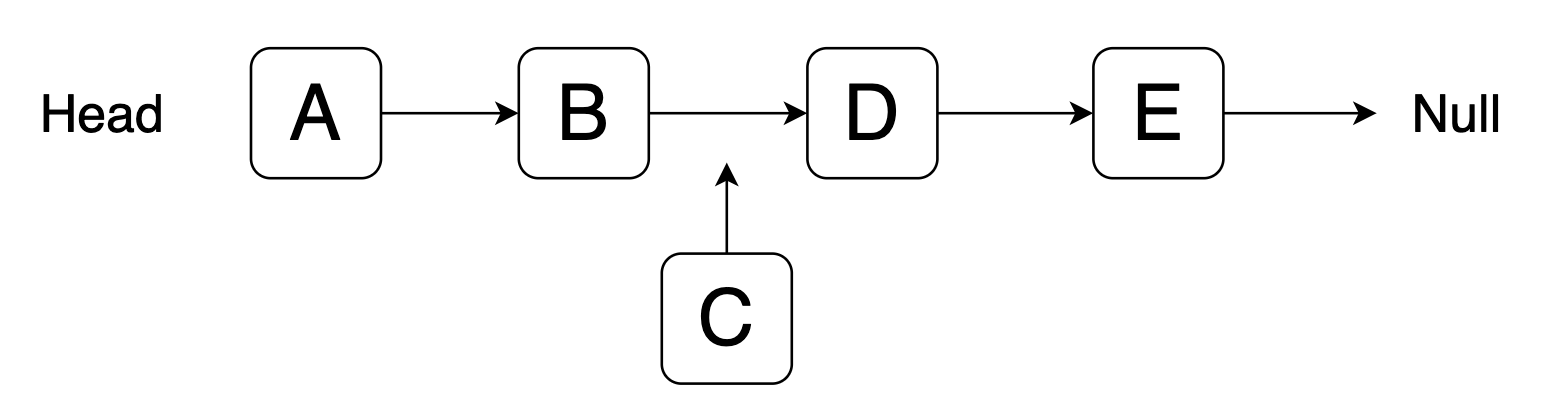
INDEX로 값을 가져오는부분에서는 ArrayList가 압도적으로 빠릅니다. 그 이유는 ArrayList는 배열의 INDEX로 값을 가져오기 때문에 O(1)의 속도로 바로 값을 가져오지만 LinkedList는 head부터 해당 index가 나올때까지 값을 검색하기 때문에 최대 O(n)의 속도를 가지기 때문입니다.
실제로 i를 100만번 수행시켰지만 도저히 끝날 기미가 보이지 않아 linkedListGet 메서드의 i를 100으로 설정시켜서 테스트했습니다.
ArrayList는 100만번 수행시켜도 0ms인 값이 변하지 않았습니다.
결론
ArrayList를 사용할 때, List에 들어갈 데이터의 수를 알고있다면 initialCapacity를 설정하자
데이터의 수의 대략적인 수를 알고있다면 initialCapacity를 넉넉하게 설정해도 좋다. 정확하게 설정하는것보다는 느리지만 기본생성자로 설정하는것보다 유의미한 속도향상이 있었다. ( LIST_SIZE = 100만일때, LIST_SIZE + LIST_SIZE 의 크기로 설정해도 5ms 내외의 차이정도밖에 확인되지 않았다)
INDEX를 자주사용하는 메서드에서는 무조건 ArrayList를 사용하자.
List 내에서 추가, 삭제가 빈번히 발생한다면 LinkedList를 사용하자.
# 혼자 공부하고 작성한 글이기 때문에 정확하지 않을 수 있습니다. 대략적인 가이드? 같은것이기 때문에 참고용도로만 사용해주세요.
싱글톤 패턴은 단 하나의 유일한 객체를 만들기 위한 코드 패턴입니다. 싱글톤 패턴을 따르는 클래스는 생성자가 여러번 호출되더라도 실제 생성되는 객체는 단 하나이고, 최초 생성 이후에 호출된 생성자는 최초의 생성자가 생성한 객체를 리턴하게됩니다. 주로 공통된 객체를 여러개 생성해서 사용하는 DBCP(DataBase Connection Pool) 과 같은 상황에서 많이 사용합니다.
사용하는 주된 이유는 리소스를 많이 차지하는 무거운 클래스를 한 개의 객체로 관리하면서 메모리 절약을 할 수 있기 때문입니다.
생성자의 접근제한자를 private로 선언해서 new 생성자를 통한 객체생성을 제한하고, static 을 붙혀주면됩니다.
세번의 getInstance()로 불러와도 같은 주소를 참조하고있다는걸 확인할 수 있습니다.
다만 이 방식은 멀티쓰레드 환경에서 안전하지 않습니다. if 문에 다수의 사람이 동시에 들어간다면 객체라 여러번 생성될것입니다.
이러한 싱글톤 패턴의 종류는 여러가지가 있습니다. 검증된 싱글톤 패턴을 확인하시려면 6번과 7번으로 넘어가주세요.
1. Eager Initialization
public class Singleton {

    private static final Singleton instance = new Singleton();

    private Singleton() { }

    public static Singleton getInstance() {
        return instance;
    }
}
미리 만들어주는 방법입니다. static 영역에 재할당이 불가능한 final 이기때문에 멀티쓰레드 환경에서 안전합니다. 다만 예외처리를 할 수 없고, 리소스가 크다면 static 영억에서 자원을 사용하지 않더라도 메모리에 적재하기 때문에 자원낭비가 될 수 있습니다.
2. Static block Initialization
public class Singleton {

    private static Singleton instance;

    private Singleton() { }

    static {
        try {
            instance = new Singleton();
        } catch (Exception e) {
            e.printStackTrace();
        }
    }

    public static Singleton getInstance() {
        return instance;
    }
}
static block ( 클래스가 로딩되고 클래스 변수가 준비된 후 자동으로 실행된느 블록)
static block을 통해 예외를 처리할 수 있습니다.
3. Lazy Initialization
public class Singleton {

    private static Singleton instance;

    private Singleton() { }

    public static Singleton getInstance() {

        if (instance == null) {
            instance = new Singleton();
        }
        return instance;
    }
}
처음 싱글톤 패턴을 구현했던 방식입니다.
4. Thread Safe Initialization
public class Singleton {

    private static Singleton instance;

    private Singleton() { }

    public static synchronized Singleton getInstance() {

        if (instance == null) {
            instance = new Singleton();
        }
        return instance;
    }
}
synchronized 키워드를 사용하여 쓰레드의 접근을 한개로 제한시켜 동기화시킬 수 있습니다. 하지만 매번 사용하는것은 성능하락이 될 수 있습니다.
5. Double Checked Locking
public class Singleton {

    private static volatile Singleton instance;

    private Singleton() { }

    public static Singleton getInstance() {

        if (instance == null) {

            synchronized (Singleton.class) {
                if (instance == null) {
                    instance = new Singleton();
                }
            }

        }
        return instance;
    }
}
volatile 키워드를 사용해서 캐시가 아닌 메인메모리에서 읽도록 지정해줍니다.
synchronized를 클래스에 동기화를 걸어 최초 초기화만 동기화 작업을 진행하여 리소스 낭비를 최소화 할 수 있습니다.
하지만 volatile 은 JVM 1.5이상이 되어야하고 JVM에 따라서 쓰레드 세이프하지 않는 문제가 발생할 수 있기때문에 사용하지 않는다고 합니다.
6. Bill Pugh Solution (LazyHolder)
public class Singleton {

    private Singleton() { }

    private static class SingleInstanceHolder {
        public static final Singleton INSTANCE = new Singleton();

    }
    public static Singleton getInstance() {
        return SingleInstanceHolder.INSTANCE;
    }
}
클래스 내부에 static 클래스를 만들어 사용합니다. 클래스가 메모리에 로드되지 않고 getInstance 메서드가 호출되어야 로드됩니다. 이 방식은 JVM의 클래스 로더 매커니즘과 클래스가 로드되는 시점을 이용한 방법이라고 합니다.
하지만 Reflection API, 직렬화 / 역직렬화를 통해 클라이언트가 임의로 싱글톤을 파괴할 수 있다는 단점이 존재합니다.
직렬화(Serialization) : 컴퓨터 과학의 데이터 스토리지 문맥에서 데이터 구조나 오브젝트 상태를 동일하거나 다른 컴퓨터 환경에 저장하고 나중에 재구성할 수 있는 포맷으로 변환하는 과정
역직렬화(Deserialization) : 반대로 일련의 바이트로부터 데이터 구조를 추출하는 과정
직렬화를 사용하는 이유
자바에서 원시타입 bytem short, int, long, float, double, boolean, char가 있습니다. 이를 제외한 객체들은 모두 주소값을 참조하는 참조타입입니다.
원시타입은 Stack영역에 값을 갖고있어 직접 접근이 가능하지만. 참조타입은 Heap에 존재하고 메모리 주소를 참조하고 있어 프로그램이 종료되거나 가비지컬렉터에 의해 Heap 영역에서 데이터가 제거된다면 데이터도 함께 사라집니다. 따라서 이 주소값을 외부에 전송했다고 하더라도 실제 메모리 주소에는 객체가 존재하지 않을 수 있다는것이죠.
따라서 참조타입의 객체들을 원시값 형식으로 데이터를 변환하는 과정을 거쳐 전달해야만 합니다.
직렬화의 형식
형식
특징
텍스트 기반 형식
CSV, JSON, XML
사람이 읽을수 있는 형태 저장 공간의 효율성이 떨어지고, 파싱하는데 오래걸림 데이터의 양이 적을 때 주로 사용 최근에는 JSON형태로 직렬화를 많이함 모든 시스템에서 사용 가능
사람이 읽을 수 없는 형태 저장 공간의 효율성이 좋고, 파싱이 빠름 데이터의 양이 많을 때 주로 사용 모든 시스템에서 사용 가능
자바 직렬화
Java 시스템 간의 데이터 교환이 필요할 때 사용
자바에서의 직렬화와 역직렬화
1. Serializable 인터페이스 구현
public class Person implements Serializable {

    private String name;
    private int age;

    public Person(String name, int age) {
        this.name = name;
        this.age = age;
    }

}
2. 직렬화 구현
public static void main(String[] args) {

        Person person = new Person("김OO", 20);

        byte[] serialized;

        try {
            ByteArrayOutputStream baos = new ByteArrayOutputStream();
            ObjectOutputStream oos = new ObjectOutputStream(baos);
            oos.writeObject(person);

            // serialized -> 직렬화된 Person 객체
            serialized = baos.toByteArray();
        } catch (IOException e) {
            throw new RuntimeException(e);
        }
        // 바이트 배열로 생성된 직렬화 데이터를 base64로 변환
        System.out.println(Base64.getEncoder().encodeToString(serialized));

        // 출력 결과
        // rO0ABXNyAB/sp4HroKztmZTsmYDsl63sp4HroKztmZQuUGVyc29uc1NTeAAdcbkCAAJJAANhZ2VMAARuYW1ldAASTGphdmEvbGFuZy9TdHJpbmc7eHAAAAAUdAAF6rmAT08=

    }
3. 역직렬화 구현
역직렬화의 조건은 자바 직렬화 대상 객체가 동일한 serialVersionID를 가지고 있어야합니다.
    public static void main(String[] args) {

        byte[] serialized = { -84, -19, 0, 5, 115, 114, 0, 31, -20, -89, ... 생략};

        try {
            ByteArrayInputStream bais = new ByteArrayInputStream(serialized);
            ObjectInputStream ois = new ObjectInputStream(bais);

            // 역직렬화된 Person 객체를 가져온다
            Person newObject = (Person) ois.readObject();
            System.out.println("newObject = " + newObject);
            // 출력결과
            // newObject = Person { name = '김OO', age = 20 }
        } catch (IOException | ClassNotFoundException e) {
            throw new RuntimeException(e);
        }

    }
만약 특정 필드의 값을 직렬화하고 싶지 않다면 transient 키워드를 붙히면됩니다.
public class Person implements Serializable {

    private transient String name;
    private int age;

	// 이하 생략
}

// 해당객체의 역직렬화 결과
// Person { name = null, age = 20 }
직렬화의 주의점
1. 객체의 멤버변수가 추가되었을 때
// Caused by: java.io.InvalidClassException: Person; local class incompatible: stream classdesc serialVersionUID = 8310077512291807673, local class serialVersionUID = 2986034573208750977
InvalidClassException 예외가 발생합니다. serialVersionUID가 일치하지 않는다는 뜻입니다.
멤버변수의 추가로인해 serialVersionUID가 새로운 값을 가지면서 이전 serialVersionUID 값과 일치하지 않아 생긴 예외입니다.
public class Person implements Serializable {

    @Serial
    private static final long serialVersionUID = 1L;
    private String name;
    private int age;

    public Person(String name, int age) {
        this.name = name;
        this.age = age;
    }

    @Override
    public String toString() {
        return String.format("Person { name = '%s', age = %d }", name, age);
    }
}
serialVersionUID를 명시해주면 멤버 변수를 추가해도 에러가 발생하지 않습니다. 그리고 기존에 있던 멤버변수를 삭제해도 에러가 발생하지 않습니다.
2. 객체의 멤버변수의 타입이 변경되었을 때
public class Person implements Serializable {

    @Serial
    private static final long serialVersionUID = 1L;
    private String name;
    private long age;

    public Person(String name, long age) {
        this.name = name;
        this.age = age;
    }

    @Override
    public String toString() {
        return String.format("Person { name = '%s', age = %d }", name, age);
    }
}

// java.io.InvalidClassException: Person; incompatible types for field age
age의 타입을 int -> long 으로 변경한다면 InvalidClassException 이 발생합니다.
결론
자바 직렬화는 장점이 많지만 단점도 많습니다. 이 단점을 보완하기 힘든 형태로 되어있기 때문에 제약이 많아 사용시에 주의가 필요합니다.
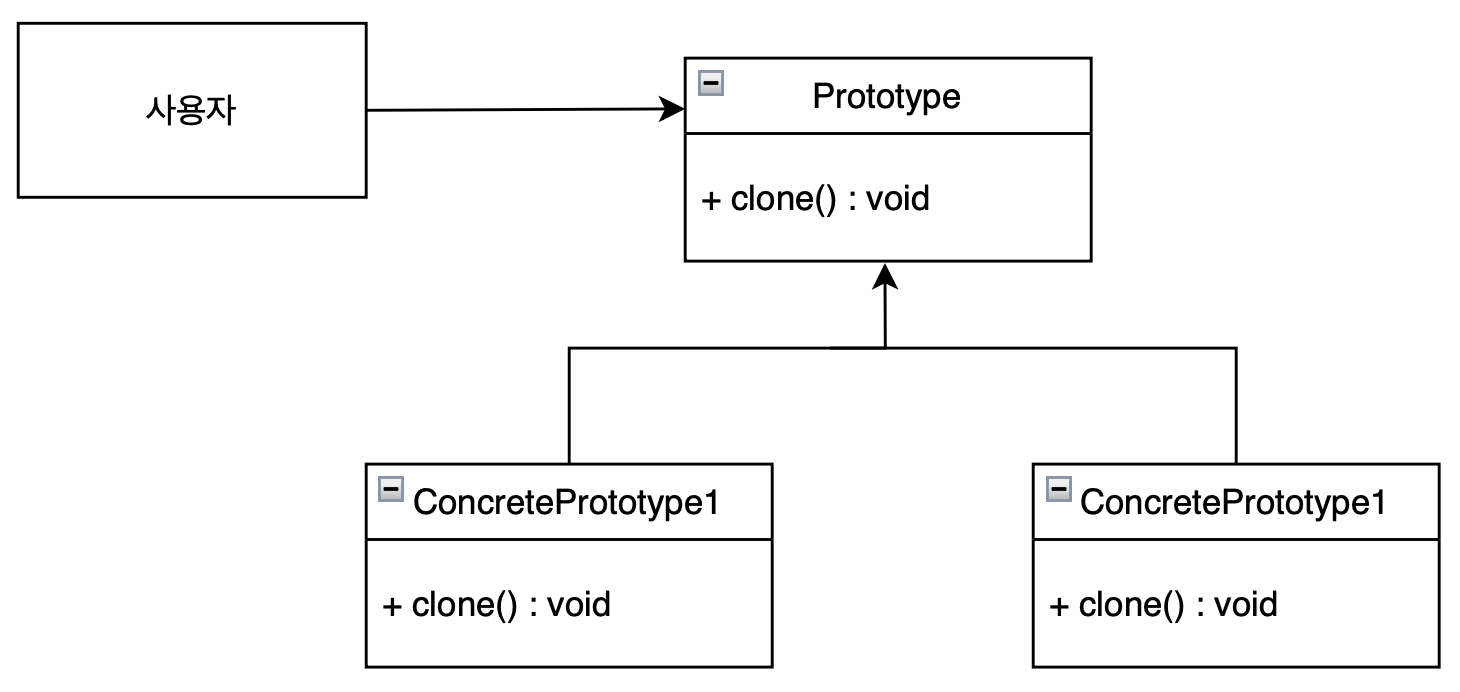
프로토타입(Prototype) 패턴은 객체를 생성하는 비용이 높은 경우, 기존 객체를 복제하여 새로운 객체를 생성하는 패턴입니다.
다시 말해 기존의 객체를 새로운 객체로 복사하여 우리의 필요에 따라 수정하는 메커니즘을 제공합니다.
이 프로토타입 패턴은 객체를 생성하는 데 비용이 많이 들고, 이미 유사한 객체가 존재하는 경우에 사용됩니다. DB로부터 가져온 데이터를 수차례 수정해야하는 경우 new 라는 키워드를 통해 객체를 생성하는 것은 비용이 너무 많이 들기 때문에 한 번 DB에 접근하여 객체를 가져오고 필요에 따라 새로운 객체에 복사하여 데이터를 수정하는 것이 더 좋은 방법입니다.
프로토타입 패턴 구현
Java에서는 이 패턴을 구현하기 위해 Cloneable 인터페이스를 사용합니다. Cloneable 인터페이스는 마커(marker) 인터페이스로, 별도의 메소드가 정의되어 있지 않습니다. 이 인터페이스를 구현하는 클래스는 얕은 복사 (shallow copy) 를 지원한다는 표시입니다.
Cloneable 인터페이스를 구현하는 이유는 clone() 메소드를 호출하여 객체를 복제하기 위함입니다. clone() 메소드는 Object 클래스에서 상속받은 메소드 중 하나로, 복제 가능한 객체에서 호출할 수 있습니다. 그러나 Cloneable을 구현하지 않은 객체가 clone()을 호출하게 되면, CloneNotSupportedException이 발생합니다.
public class Cookie{

    @Override
    protected Object clone() throws CloneNotSupportedException {
        return super.clone();
    }
}

public class Main {

    public static void main(String[] args) throws CloneNotSupportedException {

        Cookie cookie = new Cookie();
        cookie.clone(); // CloneNotSupportedException 발생!

    }
}
따라서 Cloneable 인터페이스를 구현함으로써 해당 클래스의 인스턴스가 복제 가능하다는 것을 나타내고, 이를 통해 프로토타입 패턴을 적용할 수 있게 됩니다. 하지만 주의할 점은 clone() 메소드는 얕은 복사를 수행하므로, 필요에 따라서 깊은 복사(Deep Copy)를 구현해야 할 수 있습니다.
얕은 복사
얕은 복사 (Shallow Copy)는 객체의 필드들을 복제할 때, 참조 타입의 필드는 원본 객체와 복제된 객체가 같은 인스턴스를 참조합니다.
public class ShallowCopyExample implements Cloneable {
    private int value;
    private int[] array;

    public ShallowCopyExample(int value, int[] array) {
        this.value = value;
        this.array = array;
    }

    @Override
    public ShallowCopyExample clone() throws CloneNotSupportedException {
        return (ShallowCopyExample) super.clone();
    }

    public static void main(String[] args) throws CloneNotSupportedException {
        int[] originalArray = {1, 2, 3};
        ShallowCopyExample original = new ShallowCopyExample(42, originalArray);

        ShallowCopyExample cloned = original.clone();

        // 값과 배열은 복제되지만 배열은 같은 배열을 참조하고 있음
        System.out.println(original == cloned); // false
        System.out.println(original.array == cloned.array); // true (얕은 복사)
    }
}
깊은 복사
깊은 복사 (Deep Copy) 는 참조 타입의 필드도 새로운 인스턴스를 생성하여 복사하게 됩니다. 즉 모든 필드 변수들이 새로운 인스턴스를 가집니다.
public class DeepCopyExample implements Cloneable {
    private int value;
    private int[] array;

    public DeepCopyExample(int value, int[] array) {
        this.value = value;
        this.array = array.clone(); // 깊은 복사: 배열의 복사본을 생성하여 참조
    }

    @Override
    public DeepCopyExample clone() throws CloneNotSupportedException {
        return (DeepCopyExample) super.clone();
    }

    public static void main(String[] args) throws CloneNotSupportedException {
        int[] originalArray = {1, 2, 3};
        DeepCopyExample original = new DeepCopyExample(42, originalArray);

        DeepCopyExample cloned = original.clone();

        // 값은 복제되고 배열은 복제본을 참조하고 있음
        System.out.println(original == cloned); // false
        System.out.println(original.array == cloned.array); // false (깊은 복사)
    }
}
프로토타입 패턴 구현 예제
public class Employee implements Cloneable {

    private String name;
    private int age;

    public Employee(String name, int age) {
        this.name = name;
        this.age = age;
    }

    @Override
    protected Employee clone() {
        try {
            return (Employee) super.clone();
        } catch (CloneNotSupportedException e) {
            throw new RuntimeException(e);
        }
    }
}

public class Employees {

    private final List<Employee> employeeList;

    public Employees(List<Employee> employeeList) {
        this.employeeList = employeeList;
    }

    public List<Employee> getCloneList() {
        List<Employee> clone = new ArrayList<>();

        for (Employee employee : employeeList) {
            Employee cloneEmployee = employee.clone();
            clone.add(cloneEmployee);
        }

        return clone;
    }

    public List<Employee> getOriginalList() {
        return employeeList;
    }
}
Cloneable를 사용하는 Employee 에 clone() 메소드를 오버라이드 했고, 그 리스트를 담은 Employees 에 비교를 위해 cloneList와 originalList 메소드를 구현했습니다.
public class Main {

    public static void main(String[] args) throws CloneNotSupportedException {

        Employee emp1 = new Employee("김OO", 20);
        Employee emp2 = new Employee("이OO", 22);
        Employee emp3 = new Employee("박OO", 25);
        Employee emp4 = new Employee("오OO", 29);
        Employee emp5 = new Employee("나OO", 23);

        List<Employee> employeeList = List.of(emp1, emp2, emp3, emp4, emp5);

        Employees employees = new Employees(employeeList);

        List<Employee> originalList = employees.getOriginalList(); // 같은 인스턴스
        List<Employee> cloneList = employees.getCloneList(); // clone 인스턴스

        System.out.println(employeeList == originalList); // true
        System.out.println(employeeList == cloneList); // false

        Employee originalEmp = employeeList.get(0); // 같은 인스턴스의 첫번째 Employee
        Employee cloneEmp = cloneList.get(0); // clone 인스턴스의 첫번째 Employee

        System.out.println(originalEmp == cloneEmp); // false

    }
}
프로토타입 패턴의 장/단점
프로토타입 패턴은 객체를 복제하여 새로운 객체를 생성하는 패턴으로, 이를 통해 객체 생성의 비용을 줄일 수 있습니다. 하지만 프로토타입 패턴은 특정 상황에서 유용하게 사용될 수 있지만, 모든 상황에서 적합하지는 않습니다.
장점
객체 생성 비용 감소 : 객체를 복제함으로써 새로운 객체를 생성할 때의 비용을 줄일 수 있습니다. 특히 복잡한 객체 구조이거나 생성에 많은 리소스가 필요한 경우에 유용합니다.
동적 객체 생성 : 런타임에서 동적으로 객체를 생성할 수 있습니다. 사용자가 필요에 따라 객체를 생성하고 조작할 수 있습니다.
객체 생성 시간 단축 : 객체를 복제하여 생성하기 때문에 클래스의 초기화나 설정 작업을 생략할 수 있어 객체 생성 시간을 단축할 수 있습니다.
단점
Cloneable 인터페이스의 한계 : 프로토타입 패턴을 구현하기 위해서는 Cloneable 인터페이스를 필연적으로 사용하게 되는데 이 인터페이스는 마커(marker) 인터페이스이고, clone() 메소드는 얕은 복사만을 수행하기 때문에 깊은 복사를 수행하려면 추가적인 작업이 필요합니다.
복제과정의 복잡성 : 객체가 복잡한 구조를 가지거나 참조하는 객체들이 많다면, 이를 적절하게 복제하려면 복잡한 복제 과정이 필요할 수 있습니다. 특히 객체 그래프가 순환이 발생하는 경우에 복제 과정이 더욱 복잡해질 수 있습니다.
메모리 사용량 증가 : 객체를 복제하여 생성하면 메모리 사용량이 증가할 수 있습니다. 특히 객체가 큰 데이터를 가지고 있거나 복제 해야 할 객체 수가 많을 수록 사용량이 증가합니다.
프로토타입 패턴의 사용여부는 특정 상황과 요구사항에 따라 주의 깊게 고려하여 사용해야합니다.
객체의 정확성을 깨뜨리지 않으면서 상위클래스의 객체를 하위클래스의 객체로 바꿀 수 있어야한다.
I
ISP
인터페이스 분리 원칙 InterfaceSegregationPrinciple
범용적인 인터페이스보다 클라이언트를 위한 인터페이스 여러개가 더 낫다.
D
DIP
의존관계 역전 원칙 DependencyInversionPrinciple
추상화에 의존해야지, 구체화에 의존하면 안된다.
의존관계 역전 원칙
DIP 원칙이란 사용자는 Class를 직접 참조하는것이 아니라 그 Class의 추상클래스 또는 인터페이스를 참조해야한다는 원칙입니다. 이 원칙을 따르면, 상위 계층이 하위 계층에 의존하는 의존관계를 역전(반전)시킴으로써 상위 계층이 하위 계층의 구현으로부터 독립되게 할 수 있습니다.
상위 모듈은 하위 모듈에 의존해서는 안된다. 상위 모듈과 하위 모듈 모두 추상화에 의존해야 한다.
추상화는 세부 사항에 의존해서는 안된다. 세부사항이 추상화에 의존해야 한다.
1. DIP 원칙 위반
public class Robot {

}

public class RacingCar {

}

public class Game {

}

public class Kid {

    private Robot robot;

    public void setRobot(Robot robot) {
        this.robot = robot;
    }

    public void getToyType() {
        System.out.println(robot.toString());
    }
}
Kid 클래스에는 한가지의 장난감이 들어가야합니다. 하지만 장난감은 Robot만 존재하지 않습니다. 만약 장난감을 변경해야한다면 Kid(사용자) 클래스를 수정해야합니다.
즉 이 코드는 하위 모듈을 의존하고 있습니다.
2. DIP 원칙 적용
public interface Toy { ... }

public class Robot implements Toy { ... }

public class RacingCar implements Toy { ... }

public class Game implements Toy { ... }


public class Kid {

    private Toy toy;

    public void setToy(Toy toy) {
        this.toy = toy;
    }

    public void getToyType() {
        System.out.println(toy.toString());
    }
}
Kid 클래스가 Toy 인터페이스를 의존하도록 한다면 Kid 클래스의 변경 없이 OCP 원칙 또한 지키게 되었습니다.