
개요
이번에는 OAuth2 Resource Server 를 이용해 JWT를 손쉽게 적용해보도록 하겠습니다.
JWT란?
들어가기에 앞서 JWT에 대해서 간단히 설명하자면 JWT(JSON Web Token)는 자원을 사용하기 전에 사용해도 되는 유저인지 판단할 수 있게 해주는 티켓이라고 생각하면됩니다. 그러니까 놀이공원에 들어갈 수 있게 해주는 입장권인겁니다. 놀이기구를 타기위해서는 놀이공원에 돈을 내야합니다. 그걸 증명하는게 입장권이죠. 놀이기구를 타기 전에 입장권을 검사함으로써 놀이기구(자원)을 사용하도록 직원이 허가 해줍니다. 여기서 중요시 봐야할 점은 표를 검사하는 직원은 어떤 경로를 통해 입장권을 구매했는지, 어떻게 입장권을 구했는지 알지도 못할 뿐더러 궁금해 하지도 않습니다. 그저 입장권이 있는지, 없는지만 판단하게되죠. JWT는 그런 역할을 하는 겁니다.
Web 환경에서는 Session과 Cookie를 활용해 입장권을 저장해놓을 수 있지만 REST API 로 확장하게되면 Session 과 같은 저장공간을 사용하지 못합니다. 따라서 HTTP Request Header부분에 유저의 정보를 보관해서 요청을 보내서 권한을 사용할 수 있는지 없는지 판단하게됩니다.
JWT에 대한 상세한 글은 따로 작성하도록 하겠습니다.
OAuth2 Resource Server
먼저 OAuth2 Client와 OAuth2 Resource Server 의 차이점을 짚고 넘어가겠습니다.
oauth2-client는 보호된 자원을 사용하려고 접근 요청을 하는 애플리케이션입니다.
oauth2-resource-server 는 보호된 자원을 호스팅하는 역할을 합니다.
대략적인 순서는 다음과 같습니다.
- Client가 Resource Server에 접근하기 위해 AccessToken 요청
- 인증 후 AccessToken 발급받음
- Client는 이 AccessToken을 사용해 Resource Server의 API 호출
- Resource Server는 토큰을 검증하고 요청된 리소스 제공
그러니까 oauth2-resource-server에서 토큰을 검증하는 부분을 이번에 구현하는 것입니다.
HttpSecurity oauth2ResourceServer 메소드를 살펴보면
| 메소드 | 설명 |
| bearerTokenResolver | Bearer 토큰을 추출하는 방법을 커스텀할 수 있는 기능 |
| accessDeniedHandler | 권한이 없을 때 예외 핸들링 |
| authenticationEntryPoint | 잘못된 토큰일 때 예외 핸들링 |
| jwt | jwt 관련 설정 |
| opaqueToken | opaqueToken 관련 설정 |
이렇게 되어있습니다. 우리는 jwt를 사용할 것이기 때문에 opaqueToken 설정을 제외하고 나머지를 구현해주면됩니다.
JWT 인증 흐름
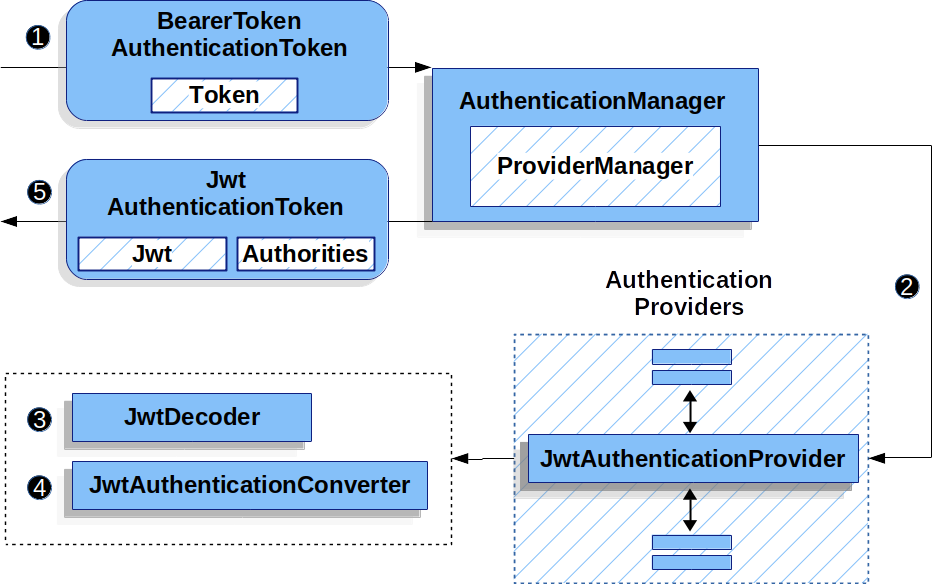
- BearerTokenAuthenticationFilter 에서 추출된 토큰을 BearerTokenAuthenticationToken으로 만들어 AuthenticationManager로 전달합니다.
- AuthenticationProvider 의 구현체인 JwtAuthenticationProvider 에서 실제 인증절차를 거칩니다.
- 그 인증절차에는 비밀키를 이용해 JWT 토큰의 무결성(위변조 여부) 검사를 하는 JwtDecoder가 있고,
- JWT 토큰을 Authentication 객체로 변환해주는 JwtAuthenticationConverter가 있습니다.
- 인증이 성공하면 JwtAuthenticationToken을 반환하게되면서 인증과정이 종료됩니다.
이 과정에서 우리가 구현해야할 부분은
- 비밀키와 함께 무결성검사를 하기위한 JwtDecoder
- JWT 토큰의 payload(사용자정보)를 커스텀해 변경된 데이터를 저장하는 AuthenticationToken이 필요합니다. 따라서 JwtAuthenticationToken를 상속한 커스텀된 AuthenticationToken
- 커스텀된 AuthenticationToken 을 convert 해줄 JwtAuthenticationConverter를 상속한 커스텀 converter
이렇게 3개가 필요합니다.
구현하기 전에
@Component
@RequiredArgsConstructor
public class JwtTokenProvider {

    private final SecretKey secretKey;
    public final int JWT_ACCESS_TIME = 60 * 60;
    public final int JWT_REFRESH_TIME = 60 * 60 * 24;

    public String generateAccessToken(TokenId tokenId, long userId,
                                        Collection<? extends GrantedAuthority> authorities) {
        return createToken(tokenId, userId, authorities, JWT_ACCESS_TIME);
    }
    public String generateRefreshToken(TokenId tokenId, long userId,
                                      Collection<? extends GrantedAuthority> authorities) {
        return createToken(tokenId, userId, authorities, JWT_REFRESH_TIME);
    }

    // 토큰 생성
    private String createToken(TokenId tokenId,
                              long userId,
                              Collection<? extends GrantedAuthority> authorities,
                              int expirationPeriod) {
        Date now = new Date(System.currentTimeMillis());

        return Jwts.builder()
            .header()
            .keyId(UUID.randomUUID().toString())
            .add("typ", "JWT")
            .and()
            .issuer("TEST_JWT")
            .claim("iss", tokenId.getProvider())
            .claim("sub", tokenId.getProviderId())
            .claim("userId", userId)
            .claim("scope", authorities.stream()
                .map(GrantedAuthority::getAuthority)
                .toList())
            .issuedAt(now)
            .expiration(new Date(now.getTime() + expirationPeriod * 1000L))
            .signWith(secretKey)
            .compact();
    }

}
커스텀된 JWT 양식입니다. 참고로만 사용해주세요.
권한정보를 넣을것이기 때문에 scope에 넣어주었습니다.
구현
application.yaml
jwt:
  secret: "{secret-key}"
JwtDecoder
@Configuration
@RequiredArgsConstructor
public class JwtConfig {

    private final SecretKey secretKey;

    @Bean
    public JwtDecoder jwtDecoder() {
        return NimbusJwtDecoder.withSecretKey(secretKey)
            .macAlgorithm(MacAlgorithm.HS512)
            .build();
    }

}
JwtDecoder 에 비밀키와 알고리즘 HS512를 설정해주었습니다.
중요한 점은 SecretKey의 알고리즘과 JwtDecoder의 알고리즘이 서로 일치해야합니다.
HMAC-SHA 키를 생성할 때, 키의 길이에 따라 알고리즘이 자동 선택됩니다:
- 256비트(32바이트) → HS256
- 384비트(48바이트) → HS384
- 512비트(64바이트) → HS512
CustomJwtToken
@Getter
public class CustomJwtToken extends JwtAuthenticationToken {

    private final Long userId;

    public CustomJwtToken(Jwt jwt, Collection<? extends GrantedAuthority> authorities) {
        super(jwt, authorities);
        this.userId = Long.valueOf(jwt.getClaimAsString("userId"));
    }

}
JwtAuthenticationToken을 상속에 만든 CustomJwtToken 입니다.
CustomJwtAuthentication
public class CustomJwtAuthenticationConverter implements Converter<Jwt, AbstractAuthenticationToken> {

    private final JwtAuthenticationConverter jwtAuthenticationConverter = new JwtAuthenticationConverter();

    @Override
    public final AbstractAuthenticationToken convert(Jwt jwt) { // 3
        AbstractAuthenticationToken token = jwtAuthenticationConverter.convert(jwt); // 4
        Collection<GrantedAuthority> authorities = token.getAuthorities();
        return new CustomJwtToken(jwt, authorities);
    }

}
JwtAuthenticationConverter의 convert 메소드는 final 이라 Override할 수 없어서 JwtAuthenticationConverter를 필드에서 사용하였습니다.
JwtAuthenticationConverter 를 조금더 커스텀 하고싶다면?
public class CustomJwtAuthenticationConverter implements Converter<Jwt, AbstractAuthenticationToken> {

    private final JwtAuthenticationConverter jwtAuthenticationConverter;

    public CustomJwtAuthenticationConverter() {
        this.jwtAuthenticationConverter = new JwtAuthenticationConverter();

        var grantedAuthoritiesConverter = new JwtGrantedAuthoritiesConverter();
        // 권한정보가 들어가있는 claim key가 다른경우
        grantedAuthoritiesConverter.setAuthoritiesClaimName("roles");
        // ROLE_ 접두사가 필요한 경우
        grantedAuthoritiesConverter.setAuthorityPrefix("ROLE_");

        jwtAuthenticationConverter.setJwtGrantedAuthoritiesConverter(grantedAuthoritiesConverter);
    }
    @Override
    public final AbstractAuthenticationToken convert(Jwt jwt) {
        AbstractAuthenticationToken token = jwtAuthenticationConverter.convert(jwt);
        Collection<GrantedAuthority> authorities = token.getAuthorities();
        return new CustomJwtToken(jwt, authorities);
    }

}
JwtAuthenticationConverter는 Authorities "scope", 접두사 "SCOPE_" 이 기본값입니다. 이를 수정하고싶은경우
위와 같이 설정하면됩니다. 저 같은 경우 JWT Token을 생성할때 GrantedAutority에서 authority를 꺼냈기 때문에 접두사가 붙은 상태로 생성되었습니다. 따라서
public class CustomJwtAuthenticationConverter implements Converter<Jwt, AbstractAuthenticationToken> {

    private final JwtAuthenticationConverter jwtAuthenticationConverter;

    public CustomJwtAuthenticationConverter() {
        this.jwtAuthenticationConverter = new JwtAuthenticationConverter();

        var grantedAuthoritiesConverter = new JwtGrantedAuthoritiesConverter();
        grantedAuthoritiesConverter.setAuthorityPrefix("");

        jwtAuthenticationConverter.setJwtGrantedAuthoritiesConverter(grantedAuthoritiesConverter);
    }
    @Override
    public final AbstractAuthenticationToken convert(Jwt jwt) {
        AbstractAuthenticationToken token = jwtAuthenticationConverter.convert(jwt);
        Collection<GrantedAuthority> authorities = token.getAuthorities();
        return new CustomJwtToken(jwt, authorities);
    }

}
접두사를 제거해서 사용하였습니다.
권한정보를 담지않는다면 위 과정은 생략해도 됩니다.
SecurityConfig
이전에 개발해놓았던 서버는 Web 기반이었습니다. 따라서 Security 설정을 API와 WEB을 구분해서 만들겠습니다.
@Bean
@Order(1)
SecurityFilterChain apiSecurityFilterChain(HttpSecurity http, ObjectMapper objectMapper, JwtTokenProvider jwtTokenProvider) throws Exception {

    http.securityMatcher("/api/**")

        .csrf(AbstractHttpConfigurer::disable)
        .cors(cors -> cors
            .configurationSource(apiConfigurationSource())
        )
        .authorizeHttpRequests(request -> request
            .requestMatchers("/api/user/**").hasAnyRole(Role.USER.name(), Role.ADMIN.name())
            .requestMatchers("/api/admin/**").hasRole(Role.ADMIN.name())
            .requestMatchers(HttpMethod.POST, "/api/login").anonymous()
            .anyRequest().permitAll()
        )
        .sessionManagement(session -> session
           .sessionCreationPolicy(SessionCreationPolicy.STATELESS)
        )
        // oauth2-resource-server 설정 부분
        .oauth2ResourceServer(server -> server
            .jwt(jwt -> jwt
                .jwtAuthenticationConverter(new CustomJwtAuthenticationConverter())
            )
        );
    return http.build();
}

@Bean
@Order(2)
SecurityFilterChain defaultSecurityFilterChain(HttpSecurity http, RememberMeServices rememberMeServices) throws Exception {

    http.securityMatcher("/**")

        .authorizeHttpRequests(request -> request
            .requestMatchers("/user/**").hasAnyRole(Role.USER.name(), Role.ADMIN.name())
            .requestMatchers("/admin/**").hasRole(Role.ADMIN.name())
            .requestMatchers("/login", "/signup").anonymous()
            .anyRequest().permitAll()
        )

        /// ... 이전 설정과 동일

    return http.build();
}

// SecretKey Bean 등록
@Bean
SecretKey secretKey(@Value("${jwt.secret}") String secretKey) {
    return Keys.hmacShaKeyFor(secretKey.getBytes(StandardCharsets.UTF_8));
}
결과
@RestController
@RequiredArgsConstructor
public class RestMainController {


    @GetMapping("/api/user/profile")
    public ResponseEntity<Long> userProfile() {
        CustomJwtToken customJwtToken = (CustomJwtToken) SecurityContextHolder.getContext().getAuthentication();
        return ResponseEntity.ok(customJwtToken.getUserId());
    }

}
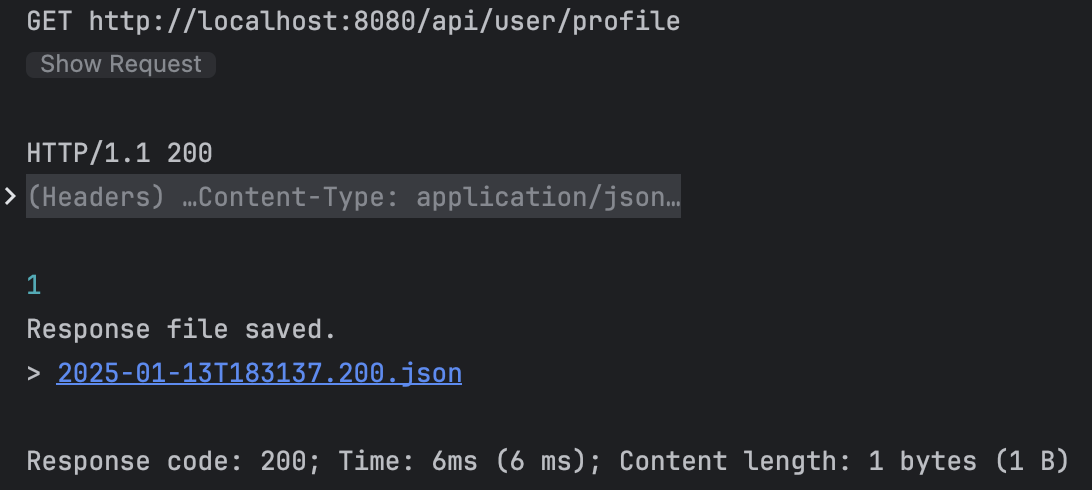
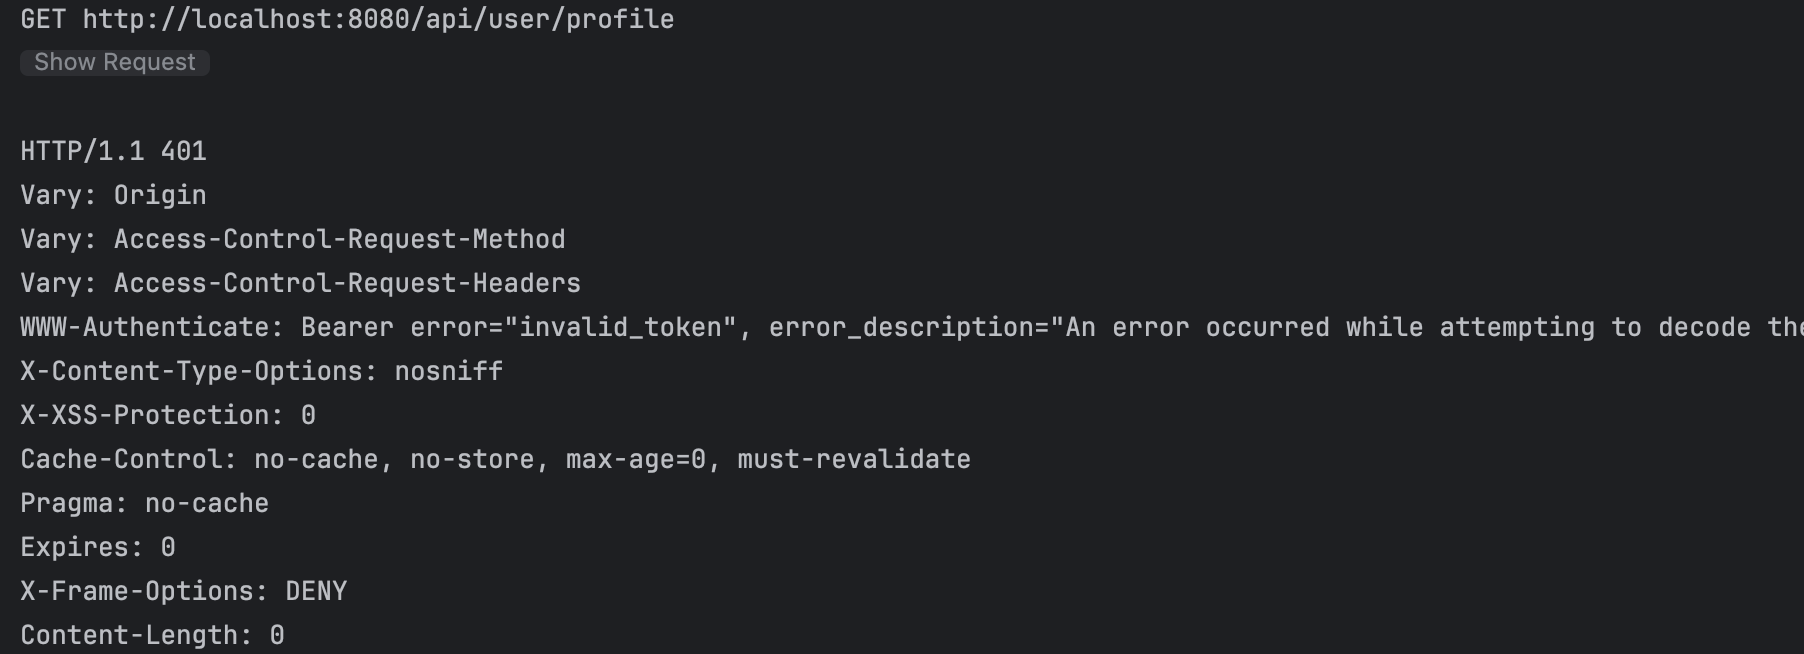
이렇게 테스트할 Controller를 만들고, 만들어진 JWT로 시도해봅시다.
조금 더 간단하게 써보자
CustomJwtToken customJwtToken = (CustomJwtToken) SecurityContextHolder.getContext().getAuthentication();일단 이렇게 쓰는게 너무 마음에 안듭니다.
public class JwtUserContextHolder {

    public static CustomJwtToken getJwtToken() {
        return (CustomJwtToken) SecurityContextHolder.getContext().getAuthentication();
    }
}
@GetMapping("/user/profile")
public ResponseEntity<Long> userProfile() {
CustomJwtToken customJwtToken = JwtUserContextHolder.getJwtToken();
return ResponseEntity.ok(customJwtToken.getUserId());
}
이렇게 바꿨습니다. 이것도 조금 마음에 안듭니다. 어노테이션을 활용해서 변수로 바로 가져오게 하고싶습니다.
@Target(ElementType.PARAMETER)
@Retention(RetentionPolicy.RUNTIME)
public @interface JwtToken {
}

@Component
public class JwtTokenArgumentResolver implements HandlerMethodArgumentResolver {

    @Override
    public boolean supportsParameter(MethodParameter parameter) {
        return parameter.hasParameterAnnotation(JwtToken.class)
            && parameter.getParameterType().equals(CustomJwtToken.class);
    }

    @Override
    public Object resolveArgument(MethodParameter parameter, ModelAndViewContainer mavContainer, NativeWebRequest webRequest, WebDataBinderFactory binderFactory) throws Exception {
        return JwtUserContextHolder.getJwtToken();
    }
}
@GetMapping("/user/profile")
public ResponseEntity<Long> userProfile(@JwtToken CustomJwtToken customJwtToken) {
return ResponseEntity.ok(customJwtToken.getUserId());
}
엄청 깔끔해 졌네요.
결론
사실 이번 글에서 JWT에 관한걸 모두 다루려고 했습니다. 그런데 JWT 발급부분 (oauth2-client)과 JWT 인증부분(oauth2-resource-server) 의 역할이 구분되어있는데 하나의 글로 작성하면 혼란이 생길것같아서 어쩔 수 없이 나눠서 글을 작성했습니다.
위의 코드들은 이미 한 번 모두 구현하고 나서 파트별로 지우고 추가하면서 약간의 컴파일 오류가 생길 수는 있습니다. 그러니 따라치지 마시고 흐름만 이해하고 넘어가주시기 바랍니다. 공부하려고 글을 작성하는 거지 저도 배우는 입장이라 틀릴 수 있다는 부분 알아주셨으면 좋겠습니다.
'FrameWork > Spring' 카테고리의 다른 글
| [Spring Boot] 선착순 이벤트 쿠폰을 만들어보자 (2) - Redis (0) | 2025.01.19 |
|---|---|
| [Spring Boot] 선착순 이벤트 쿠폰을 만들어보자 (1) - 동시성 이슈 (0) | 2025.01.16 |
| [Spring Security] HttpSecurity 메소드를 파보자 (0) | 2025.01.07 |
| [Spring Security][OAuth2] OpenID Connect(OIDC) 구현 (2) (0) | 2024.12.30 |
| [Spring Security][OAuth2] OAuth2 Log In 소셜로그인 구현 (1) (0) | 2024.12.19 |